Have you ever noticed that some rooms seem to have better energy than others? Well, it’s true. Pay attention the next time you walk into an unfamiliar space. When you enter a space filled with negative energy, you’ll notice quickly.
Believe it or not, there are ways to improve the energy in a space. This is especially important for places such as your home or office.
Smudge sticks are the ideal way to shift psychic energy. Many specialty shops sell smudge sticks, and yet you can also make them at home. The key is to find the necessary smudging herbs and follow the steps for assembly. Keep reading to learn the details.
Gather Your Herbs
The first step in the process is to locate and gather the necessary materials. Keep in mind that it’s important to use the right types of herbs. And be aware that each type of herb is effective for a different purpose.
For example, rosemary is great for cleansing and invigorating. Juniper is ideal for purification and invigorating both mind and body. Common sage is used for cleansing, meditation, and purification. And lavender is the perfect herb for creating a happy and healing environment.
You’ll also need a spool of twine or yarn for binding the herb stems together. Once you’ve gathered your materials, you’re ready to get started.
If you’re wanting to work with a true psychic, here is a resource where you can find out more information.
Prepping the Stems
Now it’s time to prep the stems for binding. To do this, choose stems that are the same length. Don’t be afraid to clip stems so that the match. You’ll need multiple stems, but be cautious not to use too many or the smudge stick will be too thick.
Forming the Handle
Next, you’ll need to form a handle. This is your starting place. The handle will provide a grip so that you can easily produce the rest of the smudge stick while holding it.
The key to this step is to align the bottom of the stems and then pinch them together. Once they’ve been pinched to form a single trunk, create some slack from your spool of twin and begin carefully wrapping it around the combined stems.
Be sure to wrap them tight enough to bind them securely together, and yet don’t over tighten or you might crush the herbs.
Binding the Herbs with Twine
Once you’ve properly formed the handle, you can move on to forming the remainder of the smudge stick.
At this point, you’ll need to free some more slack from your spool of twine. Give yourself plenty to work with, otherwise, the smudge stick won’t hold together during storage or use.
The key to properly binding a DIY smudge stick is to wrap the twine with an effective pattern. The best pattern for this task is zigzag. Move the twine up a small bit at a time, applying it at an angle. There’s no need to do too much at a time. Just be sure to keep the wrapping pattern consistent.
Be mindful of spacing the twine enough so that herbs will be able to burn as intended. Work slowly from one end to the other until the entire trunk of the smudge stick is bound as a single unit.
If you discover that you’ve used too much twine, don’t panic. Simply unwrap and start over until you get it right.
Tie a Knot
The final step of the wrapping process is to tie a knot at the top end. This can be tricky. After all, you’ll need to keep the rest of your work intact while trying to tie a good knot.
This is another reason why it’s important to give yourself enough twine to work with. Because if you run short, you might not have enough space to form the knot. Again, there’s no need to panic. Simply undo your work and start over with a longer length of twine.
Make sure the knot is good and tight, otherwise the twine will unravel and allow the herb stems to simply fall apart.
Give the Herbs Time to Dry
Congratulations, you’ve produced your own smudge stick! You’ve done a great job so far. But now the finished product will need to dry before it’s ready for use. Keep in mind that a smudge stick won’t burn until it has dried.
This step is simple. All you need to do is place the bound herbs in the sun for a couple of weeks. Placing them in a paper bag will also do the job. The key is to give the stick an adequate amount of time to fully dry.
Storing Your Smudge Stick
Once the herbs have finished drying, trim them with scissors. Then store your completed smudge stick someplace cool and dry. This will produce the best result when you are finally ready to purify your space.
How to Use a Smudge Stick
If you’ve never used a smudge stick before, you’re in for a unique experience.
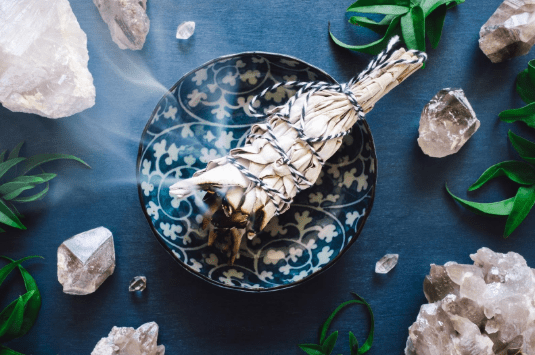
You’ll need a bowl, some matches, and a bowl of sand.
Before lightening the smudge stick, it’s crucial to set your intention. What do you want to accomplish? Keep this intention in mind as you light one end of the smudge stick with a match. Once the flame arises, quickly blow it out.
Now walk around your space, gently waving the smudge stick so that the smoke is evenly distributed. Allow the smoke to replace the stagnation and negativity, replacing it with cleansing energy.
Once you’ve walked from corner to corner, filling the space with your refreshed intention, go ahead and snuff out the smudge stick in the bowl of sand, and then set it aside to cool.
Making DIY Smudge Sticks with Smudging Herbs
Smudge sticks are the ideal way to bring positive energy into your home. Fortunately, you can save money by making them at home using smudging herbs. The tips contained here will help make the process as easy as possible.
Keep scrolling to discover more great lifestyle tips and advice.
I’m a 20-something stay-at-home mother and wife. I have an amazing husband, a beautiful daughter, two loving dogs, and a lazy cat. I wouldn’t change my life for anything! I love to read, listen to music, cook and blog!

Speak Your Mind