Flowers are a part of everyday life—kids see them in gardens, parks, and even on the kitchen table. But when you slow down and look closely, each flower holds a world of learning opportunities.
Montessori education emphasizes connecting children with the natural world in ways that spark curiosity and independence. One classic lesson is introducing the parts of a flower.
Why does this matter now? With so much screen time competing for kids’ attention, hands-on learning with natural materials helps ground them in the real world.
Exploring a flower up close is not just science—it’s sensory, creative, and deeply engaging. And with the right setup at home or in the classroom, it can be simple, fun, and memorable.
At Dannico Woodworks, we believe in creating environments that allow children to learn naturally and independently.
Just like our furniture is designed to encourage exploration and growth, Montessori activities like this give children the tools to discover the world at their own pace.
Let’s walk through how to introduce the Montessori parts of a flower step by step.
Step 1: Gather Your Materials
For this lesson, you don’t need anything complicated. A few simple materials will make the experience smooth and engaging:
- Fresh flowers (lilies, daisies, or tulips work well because their parts are easy to see)
- Montessori 3-part cards for the parts of a flower (control card with picture and word, picture-only card, and word-only card)
- A magnifying glass to let children explore details
- Small tray or mat to create a defined workspace
- Paper and colored pencils for drawing the flower afterward
If you’d like a long-lasting setup, you can also include wooden puzzles or charts of the parts of a flower. At Dannico Woodworks, we’ve seen how durable, child-sized tools and learning stations empower kids to explore with confidence—no worrying about fragile or oversized materials.
Step 2: Start With Exploration
Children learn best when they get to touch, see, and interact. Begin by placing a real flower on the tray and inviting your child to take a close look. Encourage them to use the magnifying glass, touch the petals, and notice the colors.
Keep the tone light and curious. Instead of jumping straight into teaching, ask open-ended questions:
- “What do you notice about this flower?”
- “Can you find something in the middle that looks different from the outside?”
This stage helps children connect personally with the flower before labeling its parts.
Step 3: Introduce The Names
Now it’s time to name the parts. In Montessori, we start with the Three-Period Lesson:
- Naming (This is…): Point to each part as you say its name clearly. For example, “This is the petal. This is the stem. This is the stamen.”
- Recognition (Show me…): Ask the child to show you. “Can you point to the petal? Can you find the stem?”
- Recall (What is this?): Point to a part and ask the child to name it themselves.
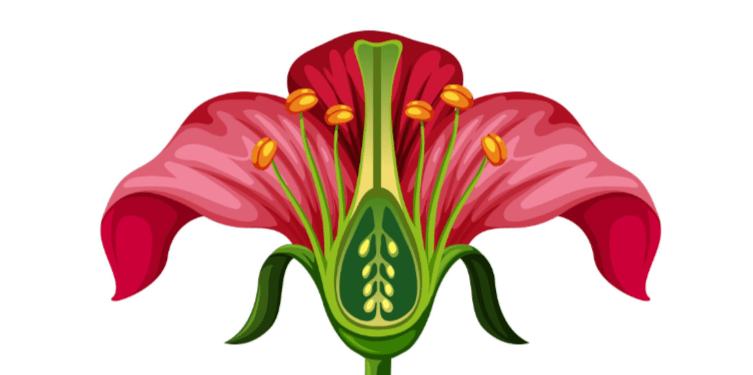
The main flower parts to highlight are:
- Petal – colorful outer part that attracts pollinators.
- Sepal – small green leaf-like parts at the base that protect the bud.
- Stem – holds the flower up and transports water.
- Stamen – male part that makes pollen.
- Pistil – female part that can grow into fruit and seeds.
You don’t need to overload your child with every detail—start with the basics and add more over time.
Step 4: Use Montessori 3-Part Cards
Once your child is familiar with the real flower, bring out the Montessori cards. These help reinforce vocabulary and give a visual reference.
- Begin with the control card (picture + word) and let the child match it with the real flower.
- Then move to the picture-only card and see if they can name the part.
- Finally, add the word-only card, letting them match it with the correct flower part.
This step deepens recognition and helps with reading skills too.
Step 5: Encourage Hands-On Discovery
Allow your child to carefully take apart a flower, separating petals, stem, stamen, and pistil. This activity feels almost magical to kids—they’re dissecting nature with their own hands.
Provide a small dish or tray to keep the parts organized. As they separate each piece, encourage them to place it next to the matching card or label.
Step 6: Reinforce Through Creative Work
Children often remember best when they get to create something themselves. Invite your child to:
- Draw the flower and label the parts.
- Color a printed outline of a flower diagram.
- Create a flower craft using paper cutouts for each part.
This stage combines science with art, reinforcing the lesson in a fun, personal way.
Step 7: Extend the Lesson Outdoors
Once your child understands the parts of a flower indoors, take the learning outside. Visit a garden or park and look for flowers in nature. Encourage them to point out petals, stems, or stamens in real life.
This makes the lesson come alive and shows kids that learning isn’t confined to a classroom—it’s everywhere.
Why This Approach Works
The Montessori method works because it’s hands-on, child-led, and layered with repetition. Instead of just telling children facts, we guide them to discover on their own. This builds confidence, independence, and a lasting love of learning.
At Dannico Woodworks, this philosophy also inspires our furniture designs. Just as Montessori materials are scaled to fit children’s hands, our child-sized tables, chairs, and storage solutions are built to give kids freedom and independence in their own space.
FAQs
Do I need special Montessori cards or can I make my own?
You can easily make your own by printing simple flower diagrams and cutting them into picture and word cards. The key is consistency and clarity.
What’s the best age to start this lesson?
Most children can begin exploring the parts of a flower between ages 3 and 6. Adjust the depth of detail based on their readiness.
How long should the lesson take?
Keep it short—about 10–20 minutes. Young children learn best in small bursts of focused activity.
What if my child isn’t interested?
That’s okay. In Montessori, we follow the child’s lead. Try again another time or start with a different flower that might catch their attention.
Final Thoughts
Introducing the Montessori parts of a flower is more than a science lesson—it’s an invitation to wonder.
By slowing down, observing, and naming the details of something as simple as a flower, children begin to see the world differently.
At Dannico Woodworks, we share that same belief: when kids are given the right tools and environment, their curiosity blossoms naturally.
Just as our furniture is designed to support independence and growth, this activity nurtures a child’s ability to explore, question, and learn with joy.
So next time you see a flower, ask yourself—how might this simple moment open the door to discovery for your child?
Hey welcome to my blog . I am a modern women who love to share any tips on lifestyle, health, travel. Hope you join me in this journey!

Speak Your Mind